Tuesday, October 17, 2017

Alabama Chanin Inspired Skirt

"The body characterizes everything it touches.  What it makes it traces over with the marks of its pulses and breathings, its excitements, hesitations, flaws, and mistakes. On its good work, it leaves the marks of skill, care, and love persisting through hesitations, flaws, and mistakes. And to those of us who love and honor the life of the body in this world, these marks are precious things, necessities of life." - Wendell Berry

I must confess that for as long as I've been on Pinterest, I have been pinning Alabama Chanin.  Just enamored with the intricate designs that they create with jersey knit, applique, and embroidery.  The appeal grew and grew the more I learned about how the company started, who they employ, and how each garment is handmade, hand sewn.  It's all so beautiful and honorable.

I found inspiration and instruction to make my own skirt from several Alabama Chanin books that I found at the library.  They've written them for people like me who have been inspired and want to try their own hand at making.

My initial plan was to stencil one of the patterns from the book onto my fabric and do the applique.  But, I also wanted to be sure that I was making a size that would fit me before investing all of that time...like hours and hours and hours.

So, this skirt is my muslin - a wearable muslin.  It bears some resemblance to this one.


I made the Swing Skirt which is from the Alabama Stitch Book.  The pattern is also in their Alabama Studio Sewing Patterns book which I got for my birthday this year.  This book is an awesome value because it has all of the patterns from every book and includes new ones as well.  It also details fitting and hand sewing techniques.


 The whole point of sewing this skirt for me was to hand sew the seams and waistband.  My stitching is a bit rough, but I know how much work went into it, so it is very satisfying to wear this handmade, hand sewn skirt.  

The side seams are sewn using the outside felled seams technique.  The seams are first sewn toward the outside of the garment, so that the seams are exposed.  Then, they are laid to one side and stitched down with an embroidery stitch.  I chose to use the Cretan stitch, which is one that is often used on their garments. The thread I used is the same that they recommend - button craft thread.  I  like the tone on tone look.


On the front and back of the skirt I used the open-felled seam technique.  This is when you sew the seam on the outside of the garment and then open the seam to add the embroidery.  Here I used the Herringbone stitch.  I left the seam allowance a bit too long, so it curls over some of the embroidery.  But, in some ways it also just adds to the earthy nature of it that I love.


In one of her interviews, Natalie Chanin shared that sewing the seams raw side out was a reflection of how she felt at the time she made her first t-shirt this way in New York.  It is an exposure of something not normally seen, nor shared, and not considered lovely.  But, when we dare do so, something beautiful can become of it.


The last piece of the skirt is the waistband.  They recommend using fold-over elastic.  So, that is what I used as well.  I also used the Cretan stitch here.  This is a bit of the inside view of the knots tied to secure the embroidery.  She is very specific about how to tie the knot, leaving the tails long, and uses the knots as embellishment on the outside of some garments.


This skirt actually ended up a bit too big.  I was overly cautious on sizing because I didn't want to end up with a tight fitting skirt - just not me.  However, with the double layer of jersey, it really weighs down and just feels a bit droopy.  Next time I will have to size down some.  It was all very much worth the time and effort however.  Not wasted at all because the process was so very satisfying and personal.

Thursday, September 28, 2017

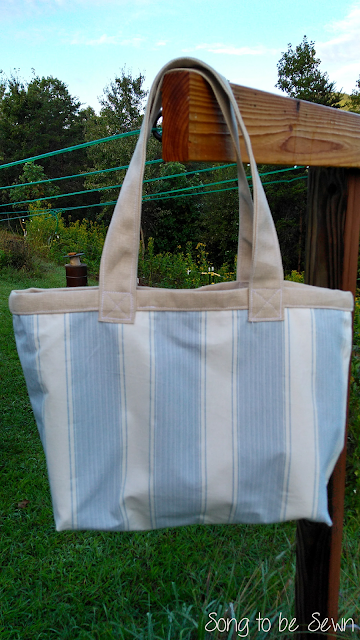
Blue and White Striped Tote - Improvised!

I've always loved making bags.  I've made many different kinds of bags over the years, most of them given as gifts.  They are my favorite thing to make because you don't have to fit them to anybody's body.  One size fits all!

I've been needing a tote bag for months now - you know the kind of bag you are always reaching for to carry books, a sweater for an evening that might turn chilly, or perhaps a knitting project in process.  All of the totes around the house always feel too big or not quite nice enough.  So, I finally made one!


I decided not to use a pattern, but rather just begin with some basic measurements and see what would happen.  Sometimes I love the freedom of sewing that way!  In the beginning, I cut the fabric so that the stripes would go horizontally across the bag.  But, once it was cut and I sewed up the sides, I realized that it was too deep and not wide enough.  Instead of starting over, I just ripped out one of the sides and turned it so that the opening would be wide and the bag not so deep.  It turned out to be the perfect size.


And the direction of the fabric changed from horizontal to vertical - unexpected, but fun!  I used a heavy cotton for the lining.  The neutral tan color goes perfect with the blue and white.  I cut the lining the same size as the outer fabric.  I sewed up three sides on both the lining and outside fabric.

I wasn't sure how I was going to finish off the bag since I had sewn all three sides up and realized I hadn't left a gap in the lining for turning the bag.  So, I put the lining inside and folded it over twice toward the outside.  I liked the look, so I just top-stitched all the way around.  This made it so easy to finish and added some interest to the overall look of the bag.  When your are improvising, nothing is a mistake, it's an opportunity to try something different.  The finished size of the the bag is 18 x 11 x 5 inches.


I used the same heavy cotton for the straps and cut them about 25 inches long and 4 inches wide.  I folded the sides in 1/2 inch and then again for a finished width of 1 1/2 inches after stitching up both edges.  Usually I tuck the straps in between the lining and the outside.  I had to think of another way since I had folded the top edge over.  So, I just stitched them to the outside of the bag using the square and "x" top stitching pattern for extra strength.

 I've already used the bag a few times and I'm really happy with the size and sturdiness.


Now everyone, go improvise!

Monday, September 18, 2017

Summer Goes On - Mercer Tunic

The Mercer Tunic by Whitney Deal is another top that I've been wearing all summer.  The past couple days temps have reached back up into the 90's, so it's a perfect time to blog it...and wear it!


I used a cotton voile fabric in a bright whimsical blue.  I really like it because it's lightweight, but not sheer, and sturdy enough to hold up through wash and wear.  I would definitely use something lightweight to make this top.  I may try making one in double gauze next time.


Whitney did a great job on this pattern incorporating french seams (love those!)  I also like the cut on the shoulders.  It drops down just a bit and almost acts like a cap sleeve.  Incidentally, I really want to find a good basic pattern that has cap sleeves.  I've tried drafting my own to add onto some of the patterns that I've already purchased, but they haven't worked out just right.  If you've made one that you like, let me know.

Here's a view of the back showing the yoke construction along with some gathering for the bodice.


The gathers give it that tunic-y, flow-y feel.  It's not very long on me because I'm tall, but I am happy with the way it turned out.


Highly recommend the Mercer Tunic pattern from a meritorious designer!