Tuesday, October 17, 2017

Alabama Chanin Inspired Skirt

"The body characterizes everything it touches.  What it makes it traces over with the marks of its pulses and breathings, its excitements, hesitations, flaws, and mistakes. On its good work, it leaves the marks of skill, care, and love persisting through hesitations, flaws, and mistakes. And to those of us who love and honor the life of the body in this world, these marks are precious things, necessities of life." - Wendell Berry

I must confess that for as long as I've been on Pinterest, I have been pinning Alabama Chanin.  Just enamored with the intricate designs that they create with jersey knit, applique, and embroidery.  The appeal grew and grew the more I learned about how the company started, who they employ, and how each garment is handmade, hand sewn.  It's all so beautiful and honorable.

I found inspiration and instruction to make my own skirt from several Alabama Chanin books that I found at the library.  They've written them for people like me who have been inspired and want to try their own hand at making.

My initial plan was to stencil one of the patterns from the book onto my fabric and do the applique.  But, I also wanted to be sure that I was making a size that would fit me before investing all of that time...like hours and hours and hours.

So, this skirt is my muslin - a wearable muslin.  It bears some resemblance to this one.


I made the Swing Skirt which is from the Alabama Stitch Book.  The pattern is also in their Alabama Studio Sewing Patterns book which I got for my birthday this year.  This book is an awesome value because it has all of the patterns from every book and includes new ones as well.  It also details fitting and hand sewing techniques.


 The whole point of sewing this skirt for me was to hand sew the seams and waistband.  My stitching is a bit rough, but I know how much work went into it, so it is very satisfying to wear this handmade, hand sewn skirt.  

The side seams are sewn using the outside felled seams technique.  The seams are first sewn toward the outside of the garment, so that the seams are exposed.  Then, they are laid to one side and stitched down with an embroidery stitch.  I chose to use the Cretan stitch, which is one that is often used on their garments. The thread I used is the same that they recommend - button craft thread.  I  like the tone on tone look.


On the front and back of the skirt I used the open-felled seam technique.  This is when you sew the seam on the outside of the garment and then open the seam to add the embroidery.  Here I used the Herringbone stitch.  I left the seam allowance a bit too long, so it curls over some of the embroidery.  But, in some ways it also just adds to the earthy nature of it that I love.


In one of her interviews, Natalie Chanin shared that sewing the seams raw side out was a reflection of how she felt at the time she made her first t-shirt this way in New York.  It is an exposure of something not normally seen, nor shared, and not considered lovely.  But, when we dare do so, something beautiful can become of it.


The last piece of the skirt is the waistband.  They recommend using fold-over elastic.  So, that is what I used as well.  I also used the Cretan stitch here.  This is a bit of the inside view of the knots tied to secure the embroidery.  She is very specific about how to tie the knot, leaving the tails long, and uses the knots as embellishment on the outside of some garments.


This skirt actually ended up a bit too big.  I was overly cautious on sizing because I didn't want to end up with a tight fitting skirt - just not me.  However, with the double layer of jersey, it really weighs down and just feels a bit droopy.  Next time I will have to size down some.  It was all very much worth the time and effort however.  Not wasted at all because the process was so very satisfying and personal.

Thursday, September 28, 2017

Blue and White Striped Tote - Improvised!

I've always loved making bags.  I've made many different kinds of bags over the years, most of them given as gifts.  They are my favorite thing to make because you don't have to fit them to anybody's body.  One size fits all!

I've been needing a tote bag for months now - you know the kind of bag you are always reaching for to carry books, a sweater for an evening that might turn chilly, or perhaps a knitting project in process.  All of the totes around the house always feel too big or not quite nice enough.  So, I finally made one!


I decided not to use a pattern, but rather just begin with some basic measurements and see what would happen.  Sometimes I love the freedom of sewing that way!  In the beginning, I cut the fabric so that the stripes would go horizontally across the bag.  But, once it was cut and I sewed up the sides, I realized that it was too deep and not wide enough.  Instead of starting over, I just ripped out one of the sides and turned it so that the opening would be wide and the bag not so deep.  It turned out to be the perfect size.


And the direction of the fabric changed from horizontal to vertical - unexpected, but fun!  I used a heavy cotton for the lining.  The neutral tan color goes perfect with the blue and white.  I cut the lining the same size as the outer fabric.  I sewed up three sides on both the lining and outside fabric.

I wasn't sure how I was going to finish off the bag since I had sewn all three sides up and realized I hadn't left a gap in the lining for turning the bag.  So, I put the lining inside and folded it over twice toward the outside.  I liked the look, so I just top-stitched all the way around.  This made it so easy to finish and added some interest to the overall look of the bag.  When your are improvising, nothing is a mistake, it's an opportunity to try something different.  The finished size of the the bag is 18 x 11 x 5 inches.


I used the same heavy cotton for the straps and cut them about 25 inches long and 4 inches wide.  I folded the sides in 1/2 inch and then again for a finished width of 1 1/2 inches after stitching up both edges.  Usually I tuck the straps in between the lining and the outside.  I had to think of another way since I had folded the top edge over.  So, I just stitched them to the outside of the bag using the square and "x" top stitching pattern for extra strength.

 I've already used the bag a few times and I'm really happy with the size and sturdiness.


Now everyone, go improvise!

Monday, September 18, 2017

Summer Goes On - Mercer Tunic

The Mercer Tunic by Whitney Deal is another top that I've been wearing all summer.  The past couple days temps have reached back up into the 90's, so it's a perfect time to blog it...and wear it!


I used a cotton voile fabric in a bright whimsical blue.  I really like it because it's lightweight, but not sheer, and sturdy enough to hold up through wash and wear.  I would definitely use something lightweight to make this top.  I may try making one in double gauze next time.


Whitney did a great job on this pattern incorporating french seams (love those!)  I also like the cut on the shoulders.  It drops down just a bit and almost acts like a cap sleeve.  Incidentally, I really want to find a good basic pattern that has cap sleeves.  I've tried drafting my own to add onto some of the patterns that I've already purchased, but they haven't worked out just right.  If you've made one that you like, let me know.

Here's a view of the back showing the yoke construction along with some gathering for the bodice.


The gathers give it that tunic-y, flow-y feel.  It's not very long on me because I'm tall, but I am happy with the way it turned out.


Highly recommend the Mercer Tunic pattern from a meritorious designer!  

Friday, September 15, 2017

Biscayne Blouse Thrice Made


I've been wearing the Biscayne Blouse all summer long, so I can say without a doubt that this pattern by Hey June Handmade is definitely a favorite of mine.

The first one that I made is the light blue floral cotton.  I made it as a muslin and it fit so well, that I have worn it regularly.


 The neutral linen blouse is the vision I originally had for the pattern.  I love linen - the feel, the look, and the timeless nature of the fabric.  The neutral linens appeal to my sense of connection with the land.  This piece of linen was actually a skirt in its original form.  That is why you see the seams on the front and back, which I think add some texture and interest.


French seams and a hidden placket give the blouse an awesome finish.

Detail on the hidden placket

 The third blouse is also linen in my favorite color blue.


This one has a button down front because I cut the pattern out of an existing xxl long-sleeved linen shirt.  I love how the linen drapes on this one.  This is the only one that has a pocket.  It was on the original shirt, so I just sized it down and moved it over a bit.


 Will be making more of these - hope you do too!

Sunday, May 28, 2017

Avocados Are Pink

Hidden inside the avocado is something rather pink.  And this shirt was dyed with that something pink.


I never really noticed before, but if you really look at the pit of an avocado, it actually has a pinkish tint to it.  This was my first real natural dyeing project.

I saved the skins and pits from about 20 avocados in a bag in the fridge.  I simmered them in a pot (an old stainless steel pot) of water, just enough to cover them, for about an hour.  The smell was pretty interesting - kind of sweet.  Then I strained off the liquid and put it back on the stove, this time with two old shirts that I had scoured for 30 minutes - one cotton and one linen.  I wanted to see if they would take the dye differently. 

I then simmered them for an hour.  The color that you see in the pictures is pretty much how they looked after an hour.  This being my first time dyeing with avocado, I decided to leave the shirts in the dye bath overnight.  I don't think it really affected the color much at all. 

Also, I think both shirts took the dye pretty much the same.  There is not much difference in the final color - though the linen one might be a tad lighter.


I am really happy with the results.  I am not typically a pink wearing person, but this pink feels so very natural.  It's the sort of pink that really goes perfectly with brown, which is the color I wear most.  I think there are actually some brown undertones in the dye.

I also wanted to find out what shade of pink, just a quick dip would produce.  I found a remnant of lace (I think it's cotton) that I decided to dye.  It came out in a very light shade of pink with the same undertones.


One thing I want to note is that the dye did not take completely even.  I was a bit disappointed at first, but every time I wear it, I feel less and less that way.  It is a really nice feeling to wear something that you've dyed naturally.  And, some of the unevenness is due to staining that was there before I dyed the shirts.  The linen shirt is actually my garden work shirt.  It had all kinds of stains on it.  And the cotton shirt is one that I've had for awhile.  The dyeing did make some stains more apparent than before, but again, it sort of just adds to the overall natural feel and look to the shirt.

I am saving up more avocado skins and pits right now for another dye pot.  I think I will double up the amount of material that I use next time to find out if the shade of pink can be made any darker.  This has been a great fun!


Tuesday, May 16, 2017

Lone Star Baby Quilt

I joined my local Modern Quilt Guild back in February of this year and I'm so glad I did.  I've met so many encouraging women who love, love to quilt.  Many of them have been quilting for years.  There are also some like me, who have only just begun our quilting exploration.  A special part of each meeting is show and tell.  It has been very inspiring!

I was so inspired that I made my very first quilt.  I found a design that drew me in and got the creative juices flowing.  The Lone Star Baby Quilt was the perfect size to dive into.  I got out all of my scraps and began hunting for color combinations that worked together.


Amy did a great job on the tutorial - I followed the instructions with no changes.  The only trouble I had was getting all the points to meet in the middle - easier said than done.


In the end, it worked out pretty well.  I like how the blue, brown, and coral tones work together.  I didn't realize until taking pictures of the final product, but the darker tan and peach solids that are part of the framing make a couple of the areas look like elongated cubes and somewhat detract from the star shape.  I think if I did it over again, I would use all white background fabrics for that area.  I really like the dark binding that I made from scraps of the darker fabrics.  I think it frames the quilt nicely.  And, I really got to practice hand stitching.  I did all of the binding with a needle and thread and my own two hands. 


For the back, I decided to have some fun with the leftover scraps.  It took just as long (maybe longer) to do the back as it did to make the front.  I curved the strips of fabric, which made the piecing a challenge.


To me, it sort of looks like a row of books on a library shelf.  Even though I used all scraps, there are still some scraps left.  I guess they weren't small enough to begin with.


The quilting shows up pretty well on this side of the fabric.  I experimented a bit, but just ended up with some straight line quilting along the each of the edge of the star and the surrounding pieces.  I may be more adventurous next time with some free motion quilting, but I do like the simplicity of the straight stitching too!

I really like this pattern and would highly recommend it.

Wednesday, March 2, 2016

One For Him and One For Her >>> Sacs of Wool

I recently made a bag for him from wool...


...that used to be a coat.  Or rather, two coats.

I really enjoy making bags.  It is an especially nice way to upcycle garments that just don't have much going for them anymore.

And wool is super expensive, unless you pick it up at the thrift store for a couple of dollars in the form of a coat, or a sweater, or a skirt.

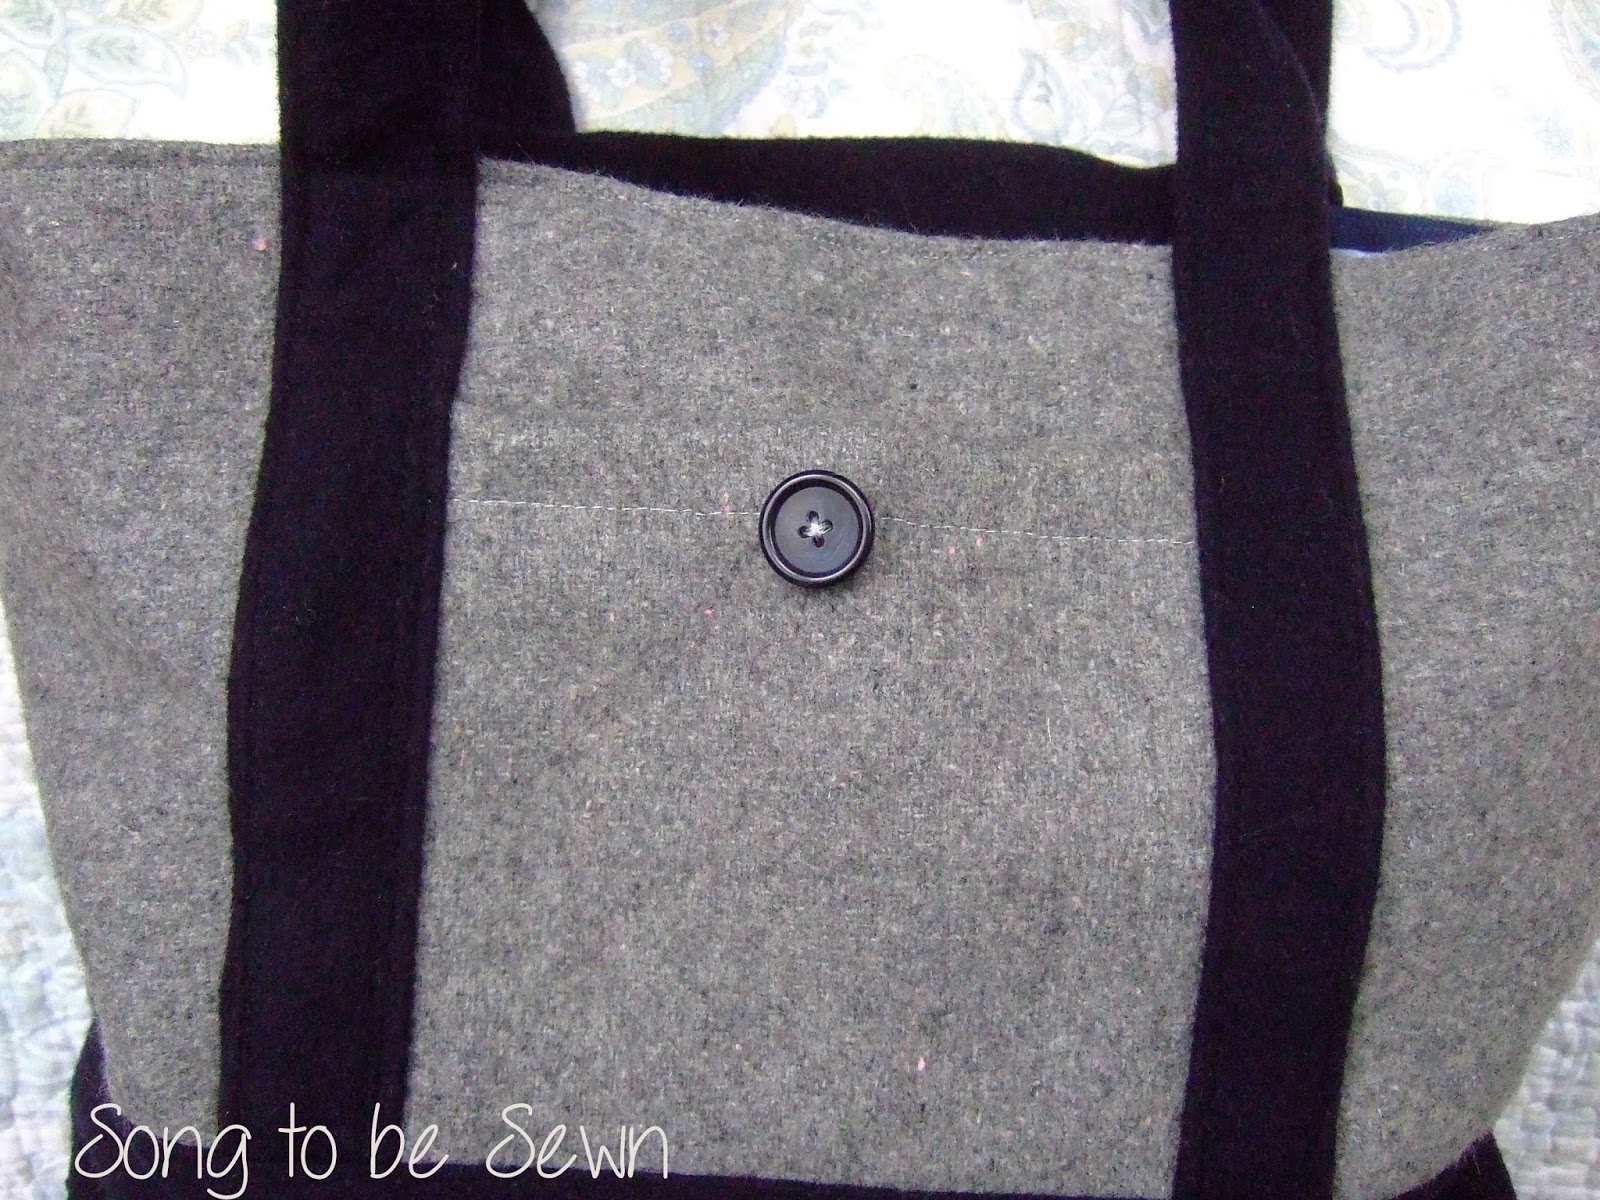
So, these two coats came together as a gift for my husband.  This is a much more manly bag (and more suitable) than the Trader Joe's reusable bag that he has been using for quite some time.

I like to put lots of pockets in the bags that I make.  There is one in the front for hard to find items like keys.


There is also a very large one inside for a water bottle, a wallet, or other things you don't want to get crushed.  And, it would not be complete without a small pocket to hold a pen.


I used the striped fabric for the inside to give it a bit of a nautical feel.

The idea for the flap came from the coat itself.  As I thought about closure for the bag, I saw that part of the collar from the coat already had a button hole, ready to go.  I cut it across making a triangle so that the button hole would line up with the button on the pocket.  And it was done, just like that.  It felt like a moment of upcycling bliss, using a piece directly from the coat that way.  No seams or button holes to sew.


then I made a bag for her...


....made from a tweedy, wool skirt.  Just one skirt.

I made this bag with a pattern offered by Noodlehead called the Trail Tote.  I was drawn to the bag because of the piping.  I really wanted to try it.  So, when I decided to make a bag to enter into the county fair the night before I had to turn it in, this is what I made.


Now for a peek inside...


I had fun with the mix of grey, red, and white.  The zip pocket on the front was also a great detail.  Another great place to stash your keys or sunglasses.


I used a button tab closure instead of the magnetic snap, just adding it like in my Bucket Basket Tote that I made a few months ago.  I also just made the strap one piece with no hardware attached.  I like my bags to be lightweight and don't mind not having the adjustable pieces.


The strap turned out a bit long, but it works well as a cross body bag.

The pattern comes in two sizes.  I made the small bag which is good for quick trips to the store or a night out when you don't want to carry much.

I know it's a bit late to be posting about wool now that we are in March...March!, but now is actually the perfect time to gather up some of your own cast off wool at your local thrift store as they make the transition from winter to spring time clothing.  Just remember, the longer the coat (or skirt!) you buy, the easier the fabric will be to work with.  For instance, the grey that I used on the first bag was from a very long coat with no seams down the back.  Of course, you can always mix different wool fabrics to make your own one of a kind sac of wool.

Thanks for stopping by!

Saturday, February 20, 2016

My Cheyenne Cup of Tea <<< A Floral Flavored Gingham

It is so great when you find the perfect top and then realize that you can actually make the same top over and over again in as many colors and fabrics that you can possibly find.


The Cheyenne Tunic is truly my cup of tea.  It is comfortable, it is versatile, and flattering all at the same time.  It also has just enough part and pieces to it that you can really give it your own flair.


I began, thinking that I would make the tunic in all black and white gingham.  I was given tons of the fabric and thought it would be a good place to start.  I started cutting it all out, intending to make a long sleeved top.  As I laid out the sleeves with the body, I realized it was just way too much black and white checkers for me.

So, I went on the hunt through my stash for something to complement the fabric and found a beautiful, colorful, cheery floral.  When I put them next to one another I knew it was meant to be...


It suddenly felt like the piece came alive by adding a little coral here and a little yellow there.  I ended up with splashes of color on the front placket, the top of the back, and the sleeves.


The Cheyenne Tunic pattern is from Hey June!  This is the second pattern I've used from Hey June.  The first was the Sloan Leggings, which is also a great pattern.  I blogged about them in my last post.

The pdf pattern file is set up nicely so that you can print just the size(s) that you want to make.  The instructions were also really clear.  I referred to the sew along tutorial on the Hey June website for most of it as well.  The actual pictures taken of the process really helped, especially when it came time to do the plackets.


The biggest challenge that I ran into had to do with the fabric and sleeves.  I began by cutting the long sleeve version.  However, when I tried it on and tried to roll up the long sleeves, it became too tight to roll the fabric up all the way up to use the button tab.  The two issues I found were that the fabric was a bit thick and I am also a tall person.  I probably should have lengthened the sleeves from the very beginning.

By the time I realized it wasn't going to work, I had already cut both sleeves.  I also realized that I would probably be wearing the top with the sleeves rolled up all of the time anyway, so I just cut it back to the 3/4 sleeve line.  Here's the picture of the cut.  By the way, the little floral accent was a nice way to hide the stitching from the sleeve tab on the underside of the sleeve.

Cutting sleeve back to 3/4 sleeve (good bye to my beautiful placket!)
The 3/4 sleeve was still a bit short for my arm - it hit me pretty much at the elbow.  In order to make the cuff more comfortable, I lengthened it and just overlapped it.  Next time, I plan to cut a longer sleeve and also grade the sleeve from medium to large in order to widen the lower part of the arm.


Another adjustment I made was to leave off the buttons on the front placket.  I really liked the look of just having the solid pretty fabric without the muddling of buttons and button holes.  I just sewed the placket up part of the way so it is still possible to get it on and off.
 

The Cheyenne Tunic is definitely going to become a staple for me as it can be made in all sorts of fabrics.  I have a similar top that I bought which has a rayon sort of front and knit for the back and sleeves.  It is so comfortable.  I'd love to make more of them and plan to soon!