Thursday, August 6, 2015

Not Your Ordinary Couscous >>> Israeli Couscous Recipe

I've loved making couscous for quite some time.  This time of year it's especially nice because of all the fresh veggies coming out of the garden.  The recipe that I'm going to share with you today is made with a special kind of couscous that you normally don't see in stores.  However, if you live near a Trader Joe's or a Big Lots, you should be able to find some. 


It's called either Israeli Couscous like the one on the left from Trader Joe's or Pearled Couscous like the one on the right that I found at Big Lots.  The grain of the Israeli couscous is much bigger and smoother than regular couscous.

The main dish that I make with it is actually more like a side dish...kinda like a pasta salad.

To make the Israeli couscous salad

You will need:
1 1/3 c Israeli couscous (the entire TJ's box)
1 3/4 c water
1 t salt
1 T oil

Cook according to the package.  Brown the couscous in a bit of oil, slowly pour in the water and simmer for about 12 minutes.  Fluff it with a fork and let it cool in the pan while you are cutting up the veggies and making the dressing.

Next you will need:
1 medium cucumber
1 cup fresh tomatoes
2-3 T cilantro
2-3 garlic cloves
3 T lemon juice
1 t lemon zest

Chop tomatoes and cucumbers and put them in a medium serving bowl.


Finely chop the cilantro and garlic cloves and add them to the bowl.


Also squeeze the lemon juice, add the zest, and a couple pinches of salt and pepper over the top.

Next you will need:
1 T balsamic vinegar
1 1/2 T olive oil

Pour these right over the top of your veggies in the bowl and put this in the fridge until the couscous has finished cooling.

When couscous has cooled, take out your bowl of veggies and combine them together until mixed well.


Garnish with some sprigs of cilantro if you'd like.  Then take a big spoon and enjoy...or, take it to a potluck and share with friends!


Have you ever tried Israeli couscous?  Do you have a favorite recipe?  Please share in the comments below.  I would love to hear how you make it!

Saturday, August 1, 2015

Quench Your Thirst >>> A Water Bottle Sleeve


Hot! Hot! Hot! 

It's been hot since April.  We were used to the heat in Haiti, but temps in the 90's here at home, for weeks in a row, we were not expecting.  And, we are feeling most every bit of it...cold water is definitely a must!  

Especially when out and about...but carrying a water bottle just on it's own can be a nuisance...with nowhere to set it down, getting everything else wet, the dirt sticking to the bottle, then getting on your hands...you get the picture.

I've made several different kinds of water bottle sleeves over the past couple years and found them to be a really useful thing to have.  Just a couple of weeks ago it was my mom's birthday, so I decided that a water bottle sleeve might be something handy for her to have as well.

I looked through lots of patterns and ended up choosing one of the patterns from a book that I've had sitting on the shelf for awhile.


It hasn't really just sat on the shelf...I've thumbed through this book plenty of times looking at all of the beautiful projects.  The Water Bottle Sleeve is the first project I decided to tackle.  It's got a beautiful, more sophisticated design that I thought would really suit my mom.


The directions for the project were straightforward and easy to follow.  

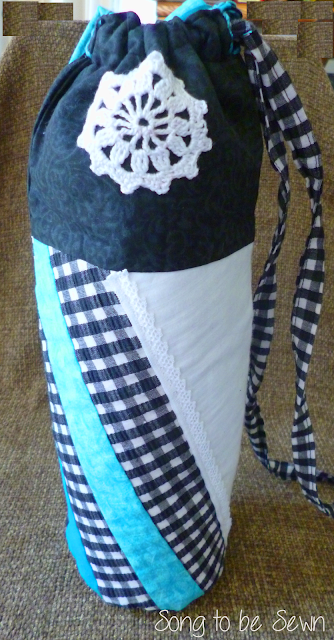
I found some turquoise, black, and white fabrics from my stash to use that coordinated beautifully.  I just pieced them together and angled it when I cut it to the dimensions needed.  (I have a hard time following a pattern without changing it in some way, shape, or form)


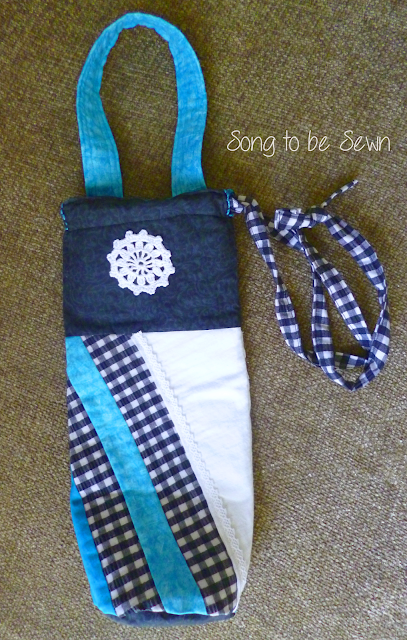
I love drawstring bags and made the string on this one really long for some reason.  It's a nice way to keep the bottle secure while adding a special touch.


I thought the lace medallion at the top was a nice addition to the project and would look great against the black fabric on top.  I found something I had crocheted awhile back and was happy to find it a great home.  The pattern came from my favorite crochet book: The Complete Photo Guide to Crochet
I sewed it on by hand using the same lace that I had used to crochet it originally.


The one other change I made was to add a sturdy handle in the back.  I had made another water bottle sleeve awhile back that included this feature and it's nice to have when you'd rather hook it on the back of a chair or carry it while walking.  I inserted the handle between the lining and the outer fabric when sewing it together.


One last tip is in order to give it more stability when setting it on a table, add some heavier weight interfacing to just the bottom piece.  My water bottle is warped on the bottom and will not even stand up anymore on it's own, but did just fine when it was inside the sleeve.  Double bonus!


How do you carry your water bottle?  Do you have a favorite pattern for a water bottle sleeve?  Share in the comments below...I'd love to hear.